Silhouette Layered NOEL Ornament

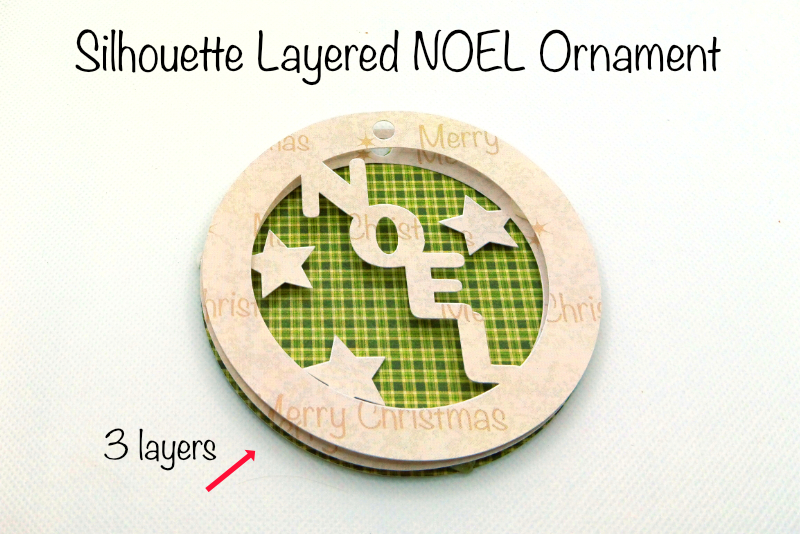
In this Silhouette Studio® tutorial, we will create a layered holiday ornament with the word NOEL.
Paper used: Twelve Days of Christmas by Graphic 45
Coiny is a Free Google Font
https://fonts.google.com/specimen/Coiny
The Silhouette Cameo 5 was supplied to me by Silhouette America.
Silhouette, Silhouette Studio, Silhouette Connect, PixScan, Silhouette CAMEO and Silhouette Portrait are either registered trademarks or trademarks of Silhouette America, Inc. Product screen shot(s) reprinted with permission from Silhouette America®, Inc.
- In the Page Setup panel, set the Machine to Cameo 5, Feed Type to Auto/Manual, Cutting mat to Cameo and Media Size to Letter (see screenshot).
- Open the Registration Marks tab and turn on the Registration Marks (see screenshot).
- With the Ellipse tool, draw a 4 by 4 inches circle cut line.
- Draw a small .25 inch circle at the top of the circle for the hanger.
- Select both cut lines, right-click and choose Group.
- Duplicate this cut line.
- Drag one of the cut lines to the left and off of the cutting area. This is the ornament base.
- Draw a 3 inches circle inside the 4 inches circle (see screenshot).
- Select the three circles, right-click and choose Group. Right-click again and choose Make Compound Path.
- Right-click on the circle group and choose Duplicate.
- Drag the duplicate ring layer off of the cutting area.
- With the Text tool, type the capital letter N. Select the letter. In the Quick Assess Toolbar, set the Size to 80 pts and the Font to Coiny.
- Add the next letter, which is the capital letter O. Drag this letter under the first letter and overlap the bottom of the N and the top of the O.
- Repeat the previous step for that last two letters, which are capital E and L.
- Group the letters together and place them over the circle layer (see screenshot). The N and the L should overlap the circle just a little. And the tips of each letter should still be overlapping just a little also. Reposition the letters as needed. When you are happy with the positioning, let's weld them together.
- Select the circle and the four letters and Weld together.
- Drag the finished NOEL top layer off of the cutting area and place it next to the 4 inch ornament base.
- Drag the second ring layer on to the cutting area.
- With the Star Flexishape, draw a star inside the circle and at the top right. Overlap one tip of the star and the circle.
- Repeat the previous step but put the stars at the left of the circle and overlapping just a little.
- Select the stars and the circle. Weld the three together.
- Drag this star layer design off of the cutting area.
- Drag the ornament base circle cut line on to the cutting area. As we will be cutting this from patterned paper, turn off the Registration Marks.
- Load your patterned paper on to your cutting mat. Cut the ornament base.
- Turn on the Registration Marks.
- Place the two design layer cut lines on to the cutting area and remove the ornament base cut line.
- With one of the cut lines selected, open the Fill panel and click the Fill Pattern tab at the top. Fill the cut line with the pattern of your choice.
- Repeat for the second design layer.
- Open the Send panel and send to the printer.
- Place the printed design on your cutting mat and send to the cutting machine.
- Attach the star layer design on top of the ornament base circle. Glue together or use foam dots to add dimension (see screenshot).
- Attach the NOEL layer design on top of the star layer design (see screenshot).
- Thread a string through the holes for all three layers of the design, to make the ornament hanger.
We will start by drawing the background circle, which will work as the base of the ornament. This will be a solid 4 inches circle.
Now we will add a smaller circle inside the other 4 inches circle. This will give use a one half inch thick ring, which will become a layer of the design. We will add the word NOEL inside the circle ring (see screenshot).
Now that we have the two cut lines for the ring layer of the ornament, let's group them together.
We will need two of these ring layers. So we need to duplicate the circle group.
Now we will work on the NOEL text (see screenshot). Use the font of your choice. But, it does help if the letters are thick. A link to the free Coiny font, which I use in this tutorial, is at the bottom of the tutorial.
That finishes the top ring layer of the design. We need a second ring layer. This layer will also be a circle, which will have stars attached (see screenshot). One star will be at the upper right edge of the circle and the other two stars will be at the left edge. In this way, the stars are not hidden by the letters. We will begin creating this second layer using the other ring layer that we created and placed to the side of the cutting area.
That completes the design (see screenshot). We are ready to print and cut. We will first cut the base circle from a patterned paper. Next we will print and cut the two design layers, using the Fill Pattern feature (see screenshot).
Cut the Base
Print and Cut Layers
Assemble
When assembling the ornament, try to match up the three small holes that will become the ornament hanger.
Paper used: Twelve Days of Christmas by Graphic 45
Coiny is a Free Google Font
https://fonts.google.com/specimen/Coiny
The Silhouette Cameo 5 was supplied to me by Silhouette America.
Silhouette, Silhouette Studio, Silhouette Connect, PixScan, Silhouette CAMEO and Silhouette Portrait are either registered trademarks or trademarks of Silhouette America, Inc. Product screen shot(s) reprinted with permission from Silhouette America®, Inc.

Related Articles
Editor's Picks Articles
Top Ten Articles
Previous Features
Site Map
Content copyright © 2023 by Diane Cipollo. All rights reserved.
This content was written by Diane Cipollo. If you wish to use this content in any manner, you need written permission. Contact Diane Cipollo for details.


