
Mockup Background in Affinity Photo
One of the most used tools in Affinity Photo is the Inpainting Brush tool, which makes fixing mistakes or removing objects from a photo very easy. I especially use this tool when I create my own product mockups from CC0 and public domain photos.
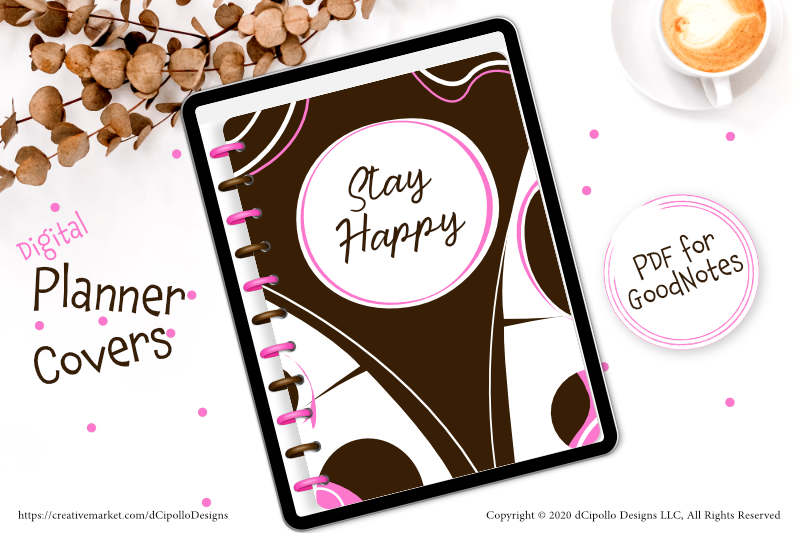
Photo manipulation is a big part of creating mockup backgrounds from CC0 images. My two favorite places for CC0 images are Unsplash and Pixabay. Both of these sites have large, good quality photos. Once you have chosen your photos, there are two ways to use them to create mockups. For method one, you will use the entire photo as a scene and place your product graphic and text in to the scene. The second method gives you more flexibility. In this method, you remove objects from the photo and save them in to another file with a transparent background. Then you can use these objects to build a custom scene.
In our example, we will use the first method with a CC0 image from Sincerely Media on Unsplash. As you can see, there are three objects in the photo and I only want the plant and coffee cup. So, I will use the Affinity Photo Inpainting feature to erase the book next to the cup. I also want to place the objects at the top of my mockup scene, leaving a lot of space below for my product graphic and text.
Our first task is to download a copy of the photo from Unsplash and open it in to Affinity Photo. Once we have the photo open, let’s do the easy stuff first, by resizing and repositioning the photo. Then we can remove the book.
When you create your mockup graphics, you will want to use the required dimensions for your marketplace, such as Etsy or Creative Market.
https://pixabay.com/
https://unsplash.com/photos/T6D9dmHPy3k
Screenshots used by permission of Serif (Europe) Ltd. This article is not endorsed by Serif Ltd..
Photo manipulation is a big part of creating mockup backgrounds from CC0 images. My two favorite places for CC0 images are Unsplash and Pixabay. Both of these sites have large, good quality photos. Once you have chosen your photos, there are two ways to use them to create mockups. For method one, you will use the entire photo as a scene and place your product graphic and text in to the scene. The second method gives you more flexibility. In this method, you remove objects from the photo and save them in to another file with a transparent background. Then you can use these objects to build a custom scene.
In our example, we will use the first method with a CC0 image from Sincerely Media on Unsplash. As you can see, there are three objects in the photo and I only want the plant and coffee cup. So, I will use the Affinity Photo Inpainting feature to erase the book next to the cup. I also want to place the objects at the top of my mockup scene, leaving a lot of space below for my product graphic and text.
Our first task is to download a copy of the photo from Unsplash and open it in to Affinity Photo. Once we have the photo open, let’s do the easy stuff first, by resizing and repositioning the photo. Then we can remove the book.
When you create your mockup graphics, you will want to use the required dimensions for your marketplace, such as Etsy or Creative Market.
- Let’s start a new document in Affinity Photo (see screenshot). Click File - New and set the Type option to Web. Set the DPI to 144 and the Height and Width as needed. In the example, I am using a Width of 2000 pixels and a Height of 1334 pixels.
- To download the photo from Unsplash, click the Download button and choose Open With (see screenshot). If Affinity Photo isn’t your default software, click Other and choose Affinity Photo. Check the box to set Photo as your default software and click OK.
- Now go to the Unsplash photo which has opened in Affinity Photo and select the Move tool. In the Menu Bar, click Edit - Copy.
- Go back to your mockup document and click Edit - Paste.
- To rotate the photo, unlock the layer if necessary and select the Move tool. In the Menu Bar, click Arrange - Rotate 90 Counter-Clockwise.
- In the Transform panel, click the icon to lock the height and width. Set the Width to 2000 pixels.
- Drag and rotate the photo so that only half of the cup and plant are visible (see screenshot).
- Select the Inpainting Brush (see screenshot). The brush already has a soft edge but let’s enlarge the Width to 200 pixels in the Context Toolbar (see screenshot).
- Paint over the book and let the software change the pixels to match the background (see screenshot).
- With the Rectangular Marquee or Freehand Selection tool (see screenshot), select the empty area at the bottom of the Canvas. From the Menu Bar, click Edit - Inpaint. Repeat for the empty area on the right edge.
- Create a new folder named Mockups in the location designated for your images. From the Menu Bar, click File - Export and save the mockup graphic as a .png file (see screenshot).
The photo will be too large for the Canvas and we want the objects to be at the top of the scene.
As you can see, the photo doesn’t cover the entire Canvas any longer. Let’s fix that and remove the book. Affinity Photo’s Inpainting feature does most of the work for us by matching the surrounding pixels to patch the empty areas and the book.
The Inpainting Brush tool is good for small areas but for large areas such as the empty areas in our photo, we will use the selection tools to first select the empty area and then apply the Inpaint function.
Now that we have our mockup background, let’s save it in a folder for mockup graphics.
https://pixabay.com/
https://unsplash.com/photos/T6D9dmHPy3k
Screenshots used by permission of Serif (Europe) Ltd. This article is not endorsed by Serif Ltd..
Powered by Creative Market

Related Articles
Editor's Picks Articles
Top Ten Articles
Previous Features
Site Map
Content copyright © 2023 by Diane Cipollo. All rights reserved.
This content was written by Diane Cipollo. If you wish to use this content in any manner, you need written permission. Contact Diane Cipollo for details.


